Using Redux with Xamarin Forms — Part 1
In this series I want to implement a simple shopping app using the Redux pattern in Xamarin Forms.
I’ve always been a fan of the Redux pattern when working with web technologies like Angular or React.
However, in my current job I mainly use Xamarin Forms and so after increasing complexity in one of my applications the call for state management became more and more obvious. So I decided to give Redux a try there as well. I want to share my experience here because I couldn’t find much sources about the combination of Redux and Xamarin Forms on the net.
For learning and understanding the redux fundamentals i can recommend the wonderful official redux page.
There are many Redux approaches in the C# and Xamarin Forms world but I chose the wonderful ReduxSimple library from David Bottiau aka Odonno, especially through the use of C# 9 features i get a nice typesafe😮 developer experience 😉.
I have chosen the form of a series to offer easily digestible parts for the reader and also to be able to go into more detail on each part.
Planned parts
In this series i want to cover the following topics
- Describing the requirements and setup ReduxSimple in a Xamarin Forms project
- Adding StoreState,Actions, Reducers and Selectors
- Using Effects to access a backend service using FakeStoreApi
- Improve Developer Experience with ReactiveUI
I’am also want to use Dependecy Injection throughout the app and the amazing Dynamic Data library.
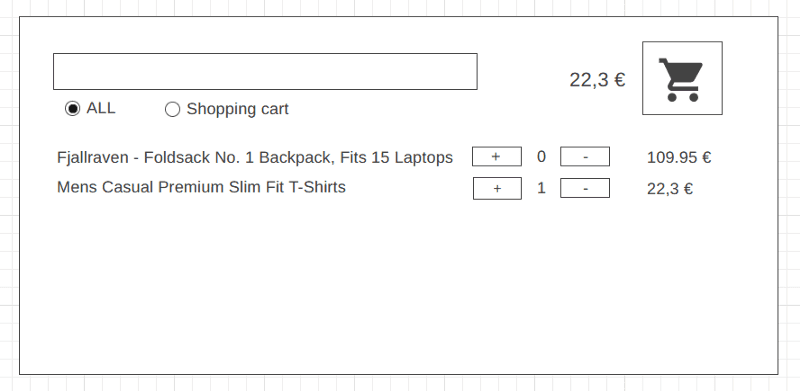
Sample App and Requirements

- In the main view you see a list of all available products
- You can add and remove products to the shopping cart
- You can search for a specific product
- You can filter if you want to see all products or those in the shopping cart
- You can see the sum of the total purchase to the left of the shopping cart button
Eventually I will add a second page with an overview of the purchases.
I will put my code on Github so everyone can see the hard facts and follow along 🙂.
Let get started
I’am using a Xamarin Forms Visual Studio Shell Template with all three platforms (Android, iOS and UWP) with the newest Xamarin Forms 5.
Preparations for C# 9
C# 9 is offering record types with value equality and nondestructive mutation which is a perfect match for Redux.
But unfortunately Xamarin Forms is currently not capable of using C# 9 out of the box but with the help of a tutorial by the amazing James Montemango, we can achieve this with a few little tweaks:
Adding the LangVersion 9 to our platform independent project .csproj file:
<PropertyGroup>
 <LangVersion>9.0</LangVersion>
</PropertyGroup>
Add the following code into the AssemblyInfo.cs file:
namespace System.Runtime.CompilerServices
{
    public class IsExternalInit { }
}
There you go. Now all the new C# 9 features can be used in Xamarin Forms.
Setup ReduxSimple
The next step is to set up ReduxSimple.
Install the Libraries/Nugets
First you need to install the necessary libraries:
- ReduxSimple
- ReduxSimple.Entity (Which is currently only available as a preview nuget, but worked for me without problems in production)


Prepare Folders and Files
My approach is to add a State folder in the root directory of the project. This folder then contains two files, RootState and Reducers.

The content of RootState is a record which contains the whole application state:
public record RootState
{
   public static RootState InitialState => new RootState();
}
which has no content at the moment, but we will add it later in part 2. It also contains a static method to simplify the creation of the initial state.
The use of a records simplifies later altering the state in the reducer.
The content of Reducers file contain a static method for create all reducers of the app state.
public static class Reducers
{
  public static IEnumerable<On<RootState>> CreateReducers()
  {
    throw new NotImplementedException();
  }
}
Currently we have only a placeholder which will be replaced in the next part by a function which creates a big reducer of all subreducer in the app.
In the next part I will show how to use subreducers and substates for each feature to split the application code by functionality
Wiring everything up
The last part of the setup is making the ReduxStore available as a Singleton in the whole App by editing the App.xaml.cs file:
public static readonly ReduxStore<RootState> Store = new ReduxStore<RootState>(CreateReducers(),RootState.InitialState,enableTimeTravel: false);The false argument disables the time-traveling functionality of the store, which i have not used yet 😉.
Notice the use of the CreateReducers method which is included in the Reducers class which is only possible by utilization of the using static directive introduced in C# 6 to made code more readable:
using static ShoppingApp.State.Reducers;Completed!!
What’s next
Wondering what’s coming in part 2?
- Implement State for the shopping cart
- Implement Reducers with usage of records and with expressions 🤩
- Implement Actions to trigger change in the store
- Implement Selectors to access and subscribe to Store changes